
Connect your call data
Recordings can be dropped in by hand for an immediate result, or pulled automatically from the storage you already use.
Two ways in
| Method | Best for | Where |
|---|---|---|
| Manual upload | Pilots, spot checks, one-off escalations, testing configuration changes. | Sidebar › Overview › Upload Call |
| Connected source | Production. The platform scans your storage on a schedule and ingests whatever is new. | Sidebar › Manage › Integrations |
Most teams use both: a connected source keeps the pipeline fed, and the upload screen stays handy for ad-hoc calls a supervisor wants looked at immediately.
Supported audio
The upload accepts MP3, WAV, WEBM, MP4, M4A and OPUS files.
- Mono or stereo. Stereo recordings with the agent and customer on separate channels give the cleanest separation — talk ratio, cross talk and per-speaker sentiment are all sharper. Mono is handled too; speakers are separated during processing.
- Filenames matter a little. A name starting with
inoroutis read as call direction (Inbound / Outbound) on the call screen, so keep your dialer’s naming convention if it has one. - Multiple files at once. Select or drop as many as you like; the tray reports each one.
Uploading by hand
- Open the upload screen Either Upload Call in the sidebar or Upload Audio in the top bar.
- Check the target workspace The Uploading to control at the top right of the screen names the workspace the files will land in. Change it there if it's wrong — the calls inherit that workspace's language, masking, dead-air and goal settings.
- Add files Drag them onto the drop zone or click to browse. Each selected file shows its size and format, and can be removed before you commit; Clear all drops the lot.
- Upload The button reports the count (Upload 12 Files). You can navigate away immediately — the floating tray keeps reporting progress and confirms when the batch is done.
- Wait for processing Uploading is not the same as processing. Calls appear in Recent Calls on the dashboard once transcription and scoring finish. Anything that fails is listed with a reason under Failed Calls.
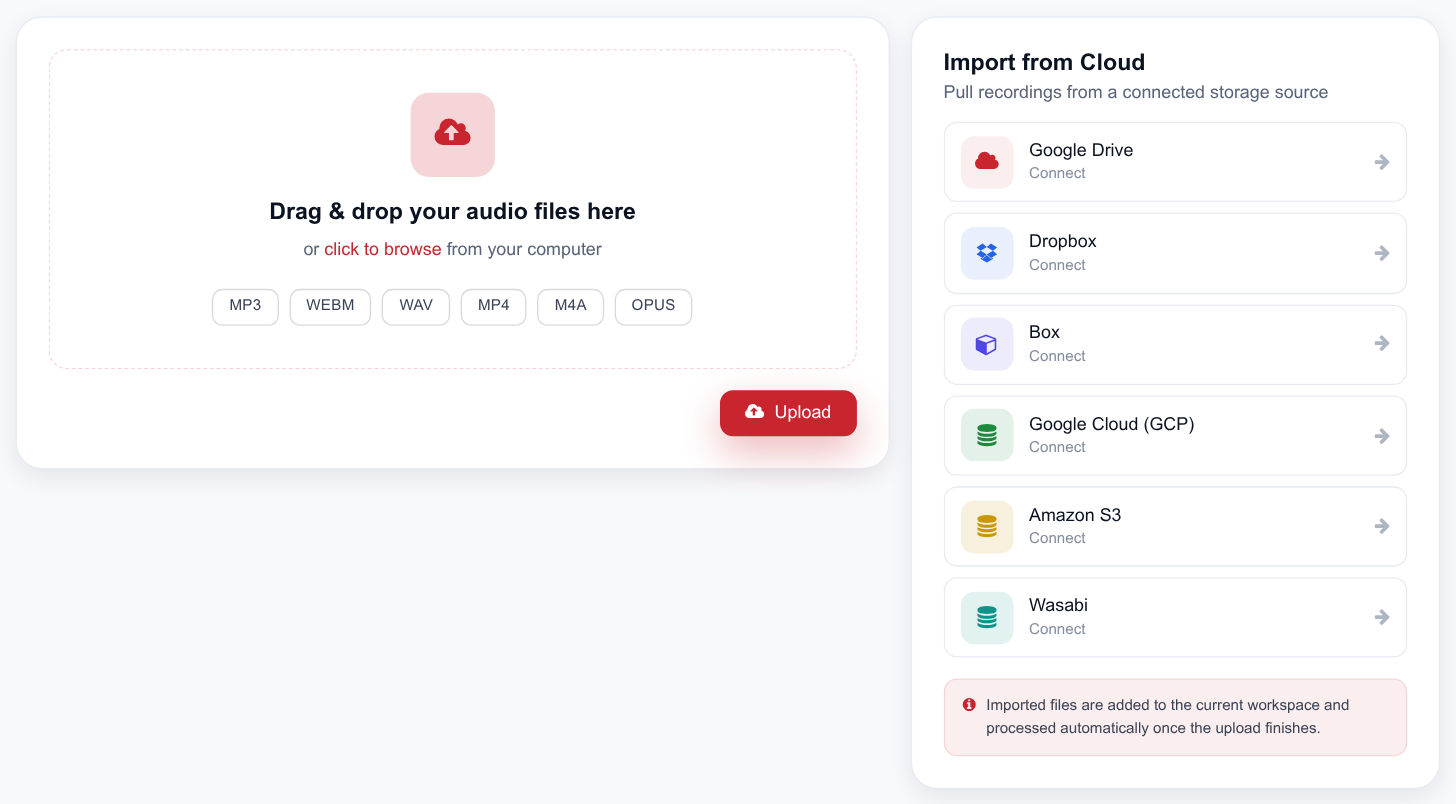
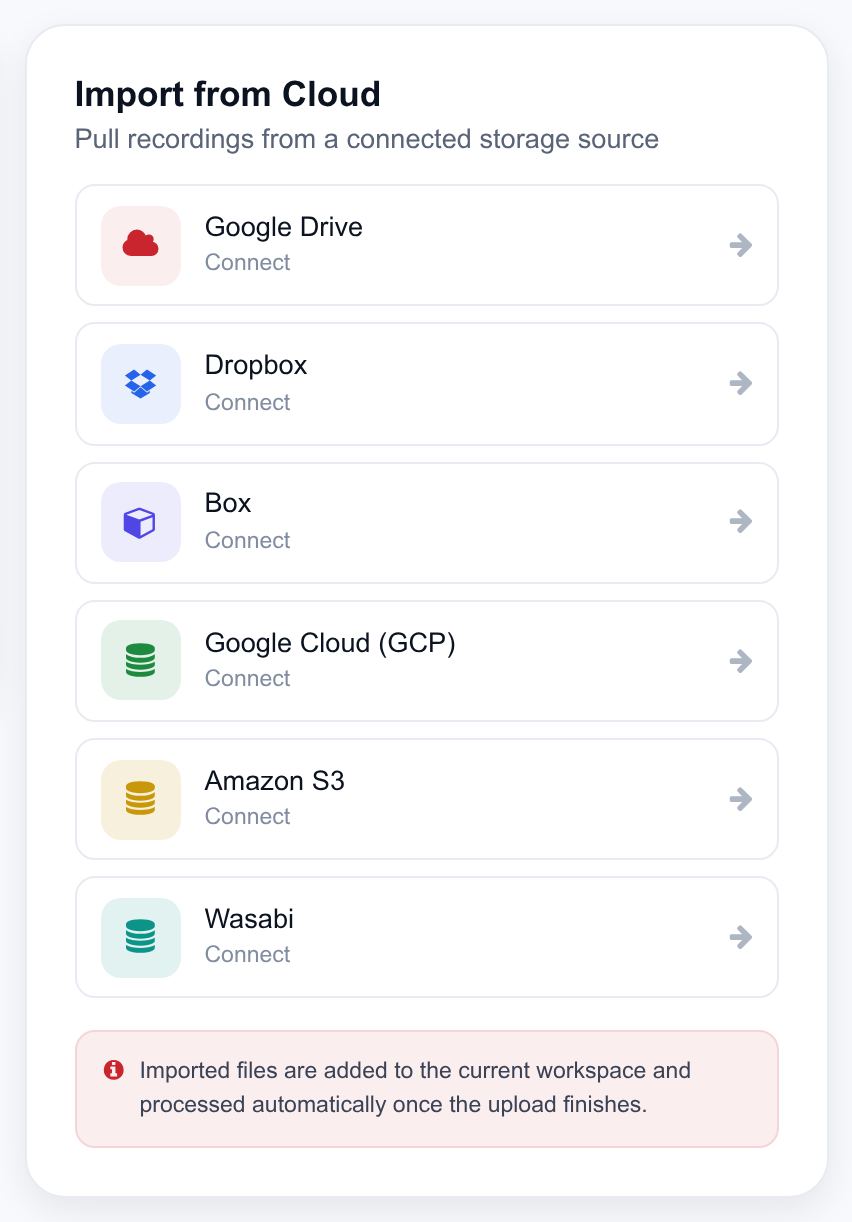
The right-hand panel of the upload screen lists your cloud sources. Use it to browse a connected account and pull specific files across, instead of waiting for the next scheduled scan.
Connected sources
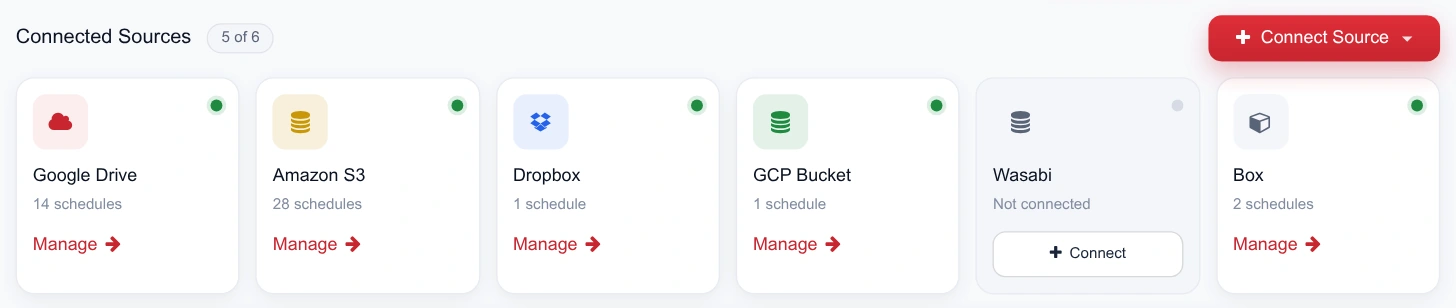
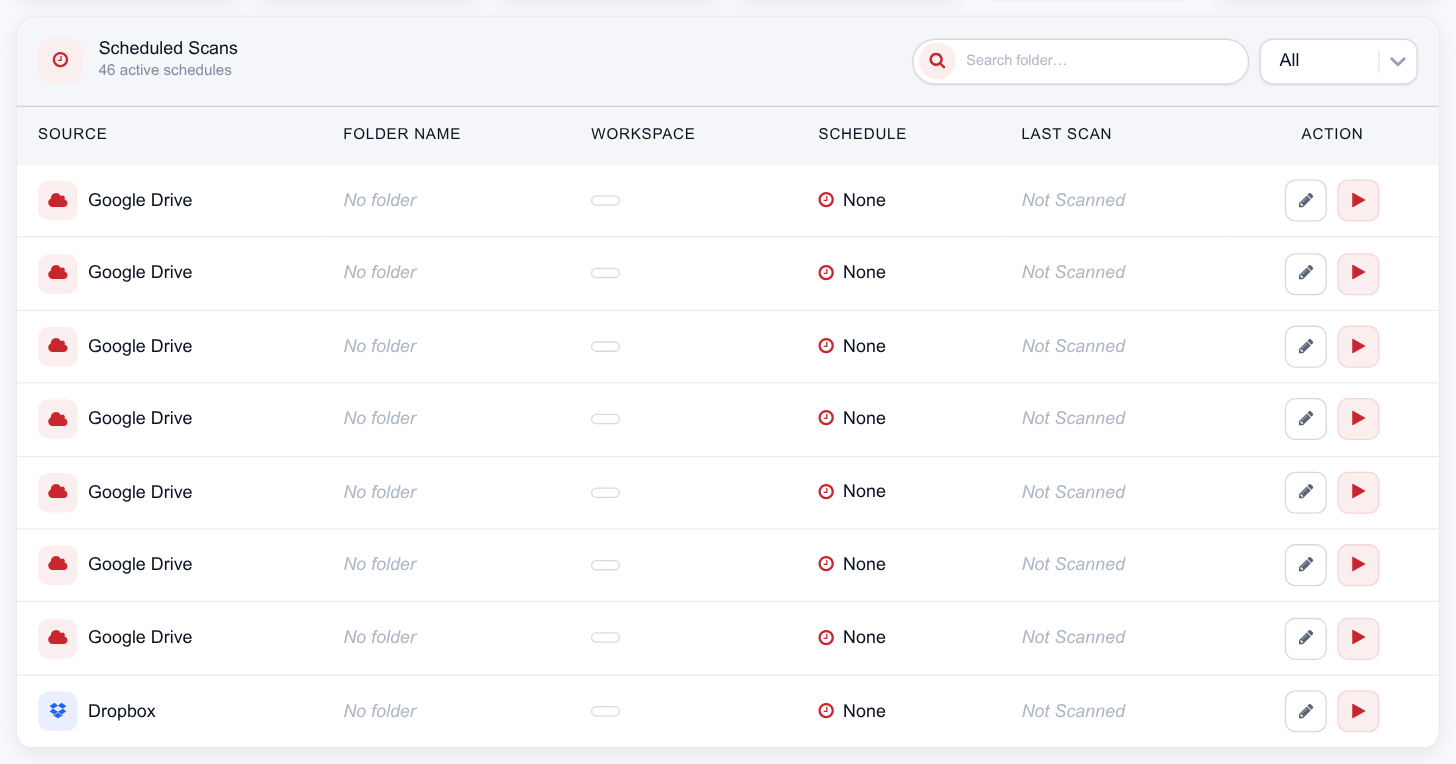
Sidebar › Manage › Integrations is the control room. The top of the screen shows all six sources with a connected/not-connected state and how many schedules each one has. Below it, Scheduled Scans lists every configured folder.
| Source | How it authenticates | You’ll need |
|---|---|---|
| Google Drive | OAuth pop-up | A Google account with access to the recordings folder |
| Dropbox | OAuth pop-up | A Dropbox account |
| Box | OAuth pop-up | A Box account |
| Amazon S3 | Bucket policy + event notification | Bucket name, and permission to edit its policy and notifications |
| GCP Bucket | Service-account credentials file | A JSON key with read access to the bucket |
| Wasabi | Access key pair | Bucket name, access key, secret key and region |
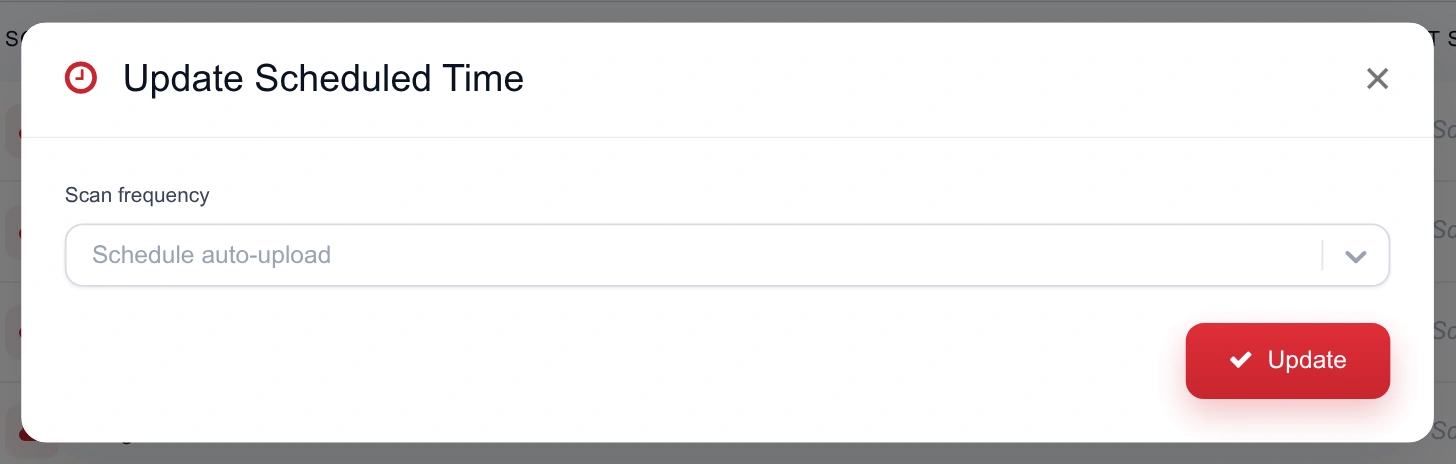
Each entry in Scheduled Scans shows the source, folder, target workspace, scan frequency and last scan time, with two actions: Edit Schedule (the pencil) and Run Now (the play button) to trigger an immediate scan without waiting.
Google Drive, Dropbox and Box
- Start the connection Connect Source at the top right of the Integrations screen, or the Connect button on that source's card.
- Authorise in the pop-up Sign in to the provider and grant read access. Allow pop-ups for the site if nothing opens.
- Pick the folder and workspace Browse to the folder holding your recordings and choose which workspace its calls belong to.
- Set the scan frequency Every 4, 8, 12 or 24 hours — or None if you'd rather trigger scans yourself.
Steps two and three run on Google's, Dropbox's or Box's own consent page, so what you see there is their screen rather than ours. You come back to Integrations once access is granted, and the schedule can be changed at any time afterwards from the pencil on the folder's row in Scheduled Scans.
Amazon S3
S3 is event-driven rather than polled: your bucket notifies the platform when an object is created, so calls arrive as they’re written. The in-app wizard walks it with screenshots and supplies the two ARNs you need — they’re specific to your account, so take them from the wizard rather than from anywhere else.
- Choose the workspace and name the bucket In the pop-up, select the target workspace and enter the S3 bucket name.
- Add the bucket policy In the AWS console open your bucket → Permissions → Bucket policy → Edit, paste the policy the wizard shows, and save. It grants the Heartbeat processing role read access to that bucket only.
- Create the event notification Bucket → Properties → Event notifications → Create event notification. Name it, tick All object create events, set the destination to SNS topic, and paste the SNS ARN from the wizard.
- Finish New recordings written to the bucket now flow in automatically.
Because it's push-based, S3 rows in Scheduled Scans show Not Applicable under Action — there's no scan to schedule or trigger. If S3 calls stop arriving, check the bucket's event notification rather than the schedule.
GCP Bucket
- Set the schedule and workspace Pick a scan frequency (4 / 8 / 12 / 24 hours) and the target workspace.
- Upload credentials Provide the service-account JSON key file for an account with read access to the bucket.
- Select the folder Choose the folder holding recordings, then save.
Creating the service-account key
In the Google Cloud console, for the project that owns the bucket:
-
Open Service Accounts
IAM & Admin → Service Accounts.
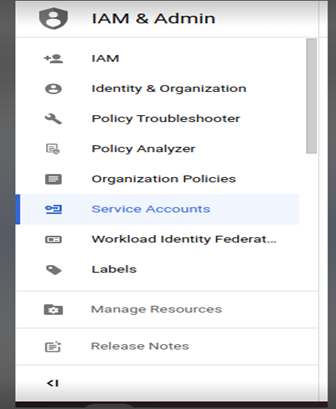
Service accounts live under IAM & Admin. -
Create the service account
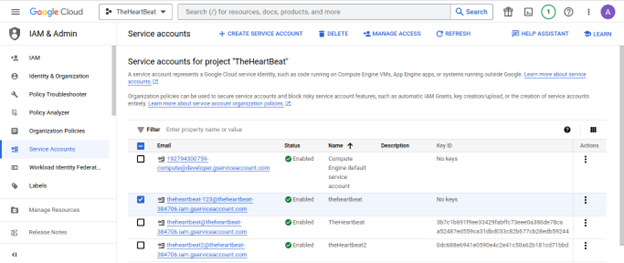
One dedicated account for Heartbeat, not a shared one. -
Grant read-only storage access
Search for and select Storage Object Viewer. Read is all the platform needs
— do not grant write or admin.
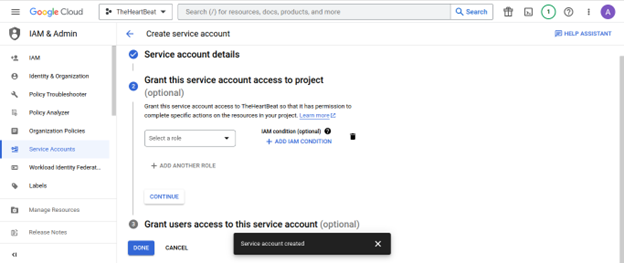
Storage Object Viewer. Anything wider is more access than the integration uses. -
Open its keys
From the account's actions menu, Manage keys.
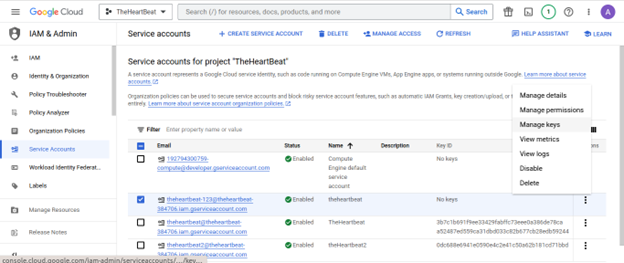
Manage keys, on the account you just created. 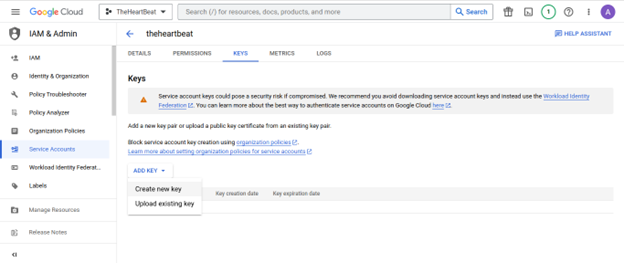
Add key. -
Create a JSON key
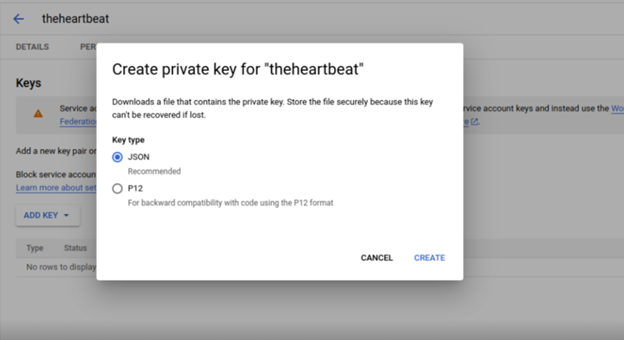
Key type JSON. The file downloads once and cannot be re-downloaded. -
Upload it to Heartbeat
The downloaded file is what the GCP connection asks for.
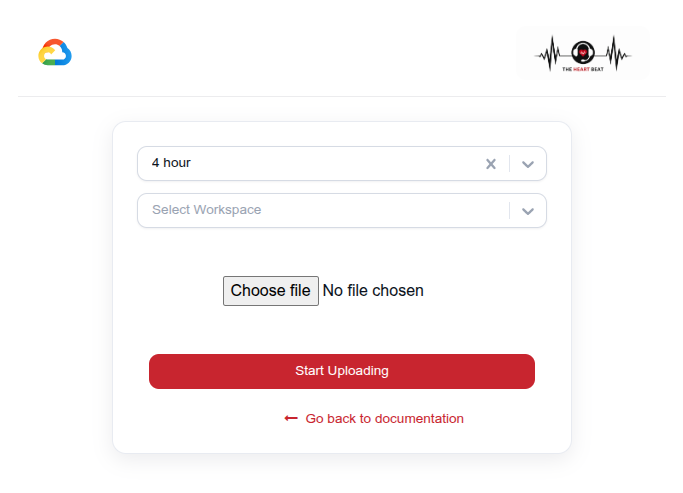
Treat the file like a password — see Source credentials.
Wasabi
- Set the schedule and workspace Frequency and destination workspace, as above.
- Choose the region Pick the region your bucket lives in — the full Wasabi region list is in the dropdown, including Asia Pacific (Mumbai).
- Enter bucket and keys Bucket name, access key and secret key, then submit.
Creating the read-only key pair
-
Create a user
In the Wasabi console, Users → Create User, and give it a name.
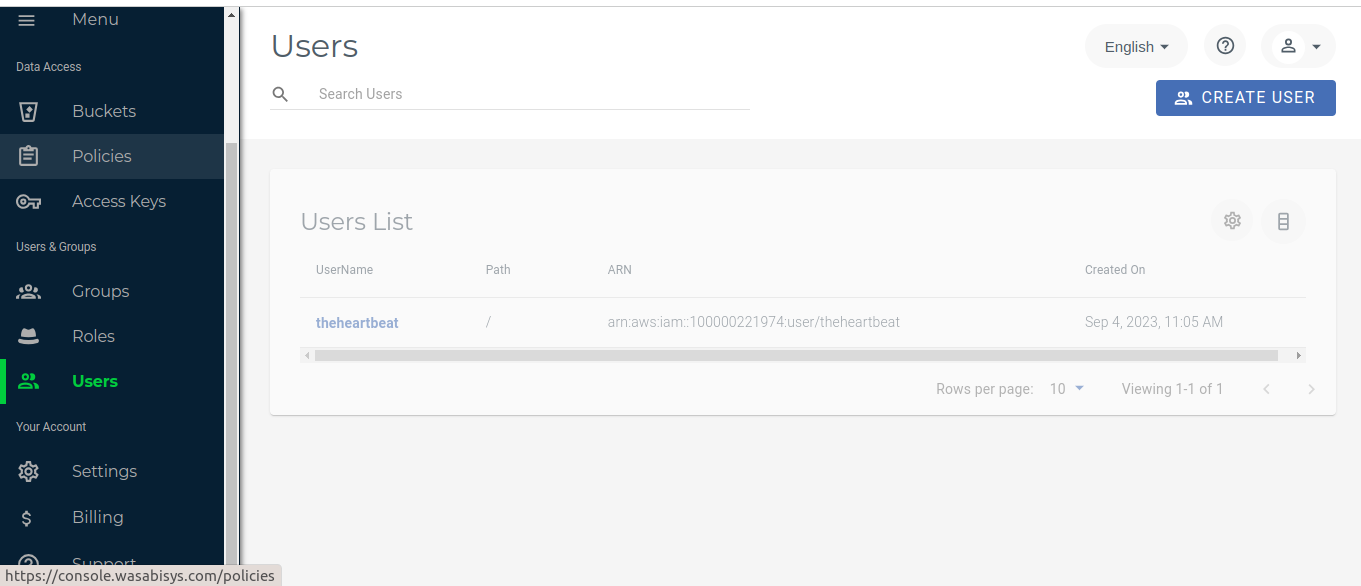
A dedicated user for Heartbeat keeps the access revocable on its own. 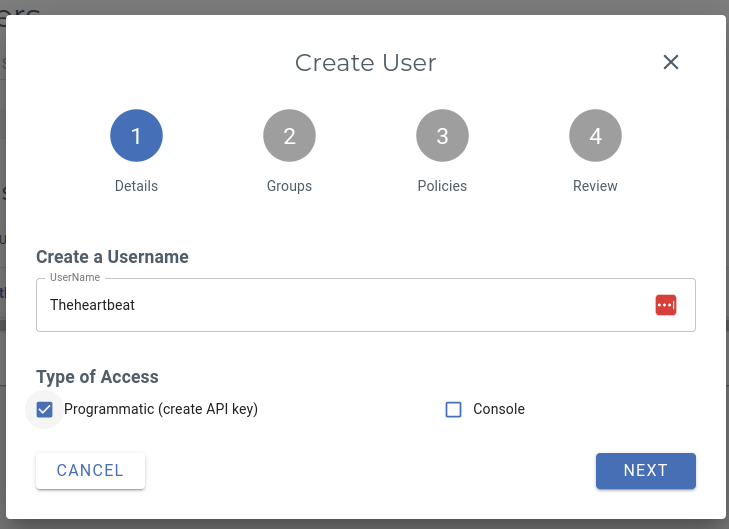
Name it for what it is, so nobody deletes it later wondering what it was. -
Put it in a group
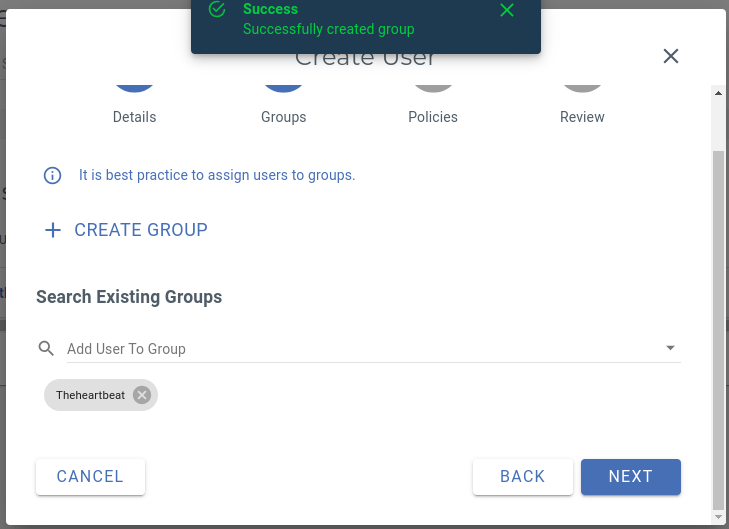
Group, then save and continue. -
Attach read-only access
Attach WasabiReadOnlyAccess. The integration never writes to your bucket.
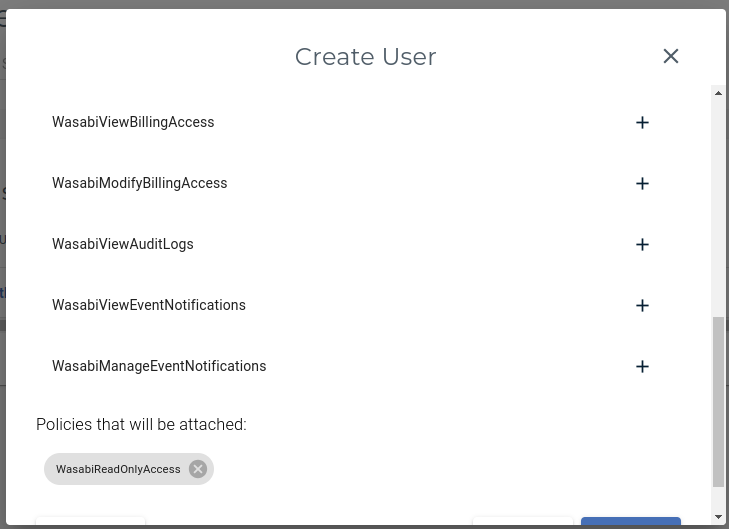
Read-only is sufficient and is what you should grant. 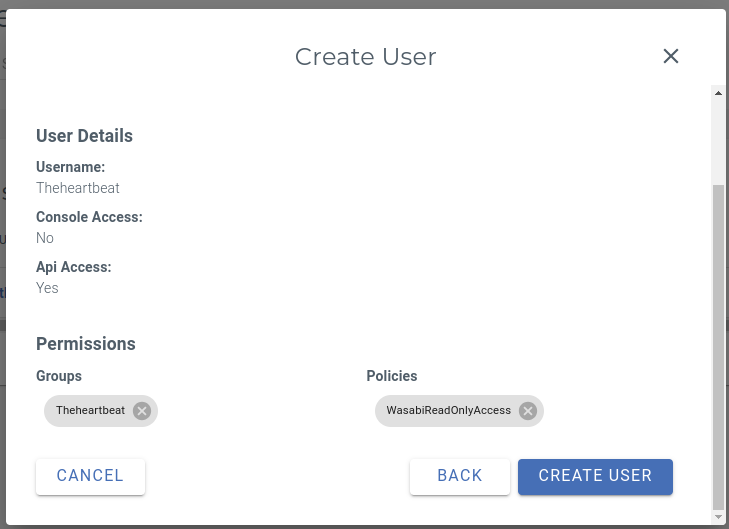
Review, then create. -
Create the access key
Open the user, go to User Access Keys and create one.
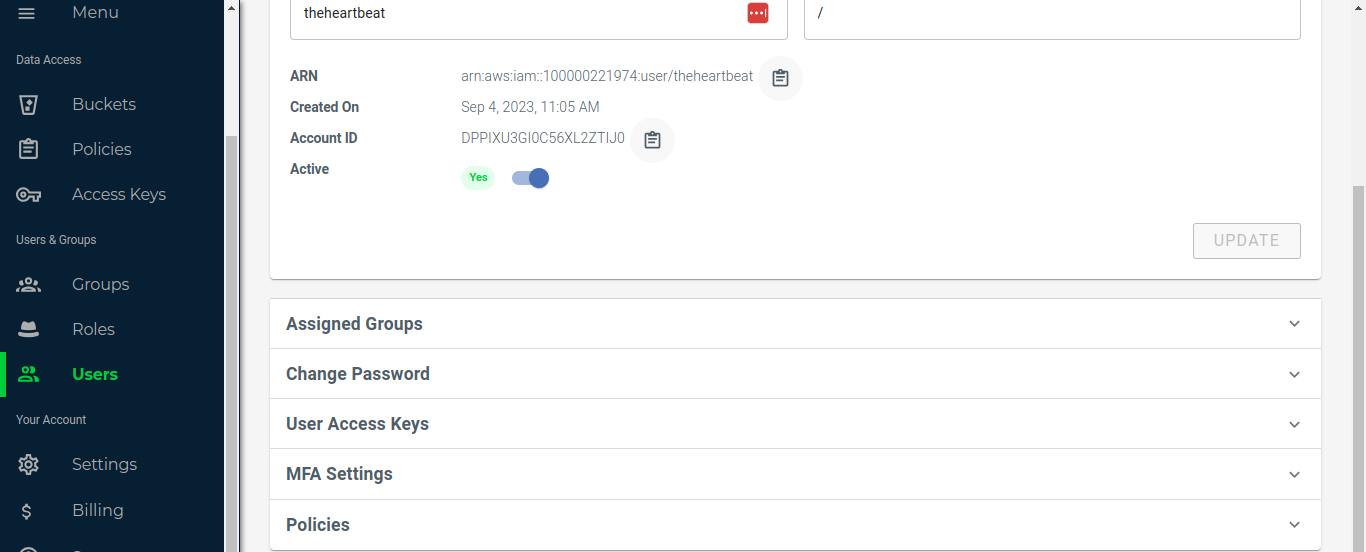
Access keys are per user. 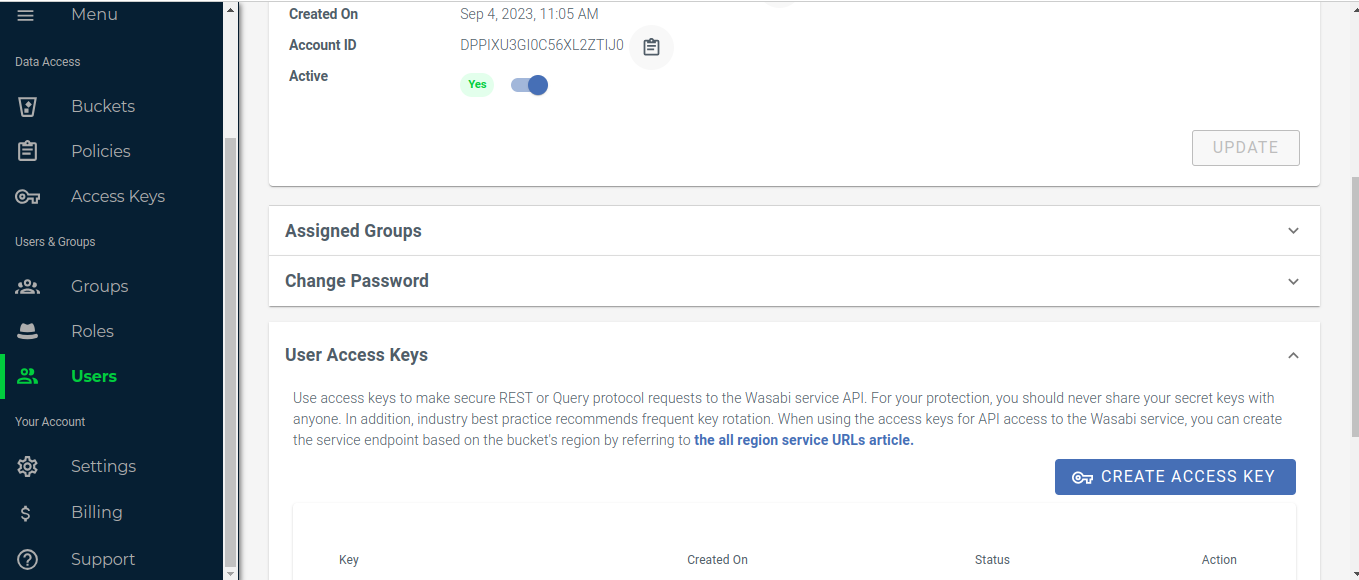
Creating the key pair. -
Copy the pair into Heartbeat
Download the CSV, then paste the access key and secret key into the Wasabi connection.
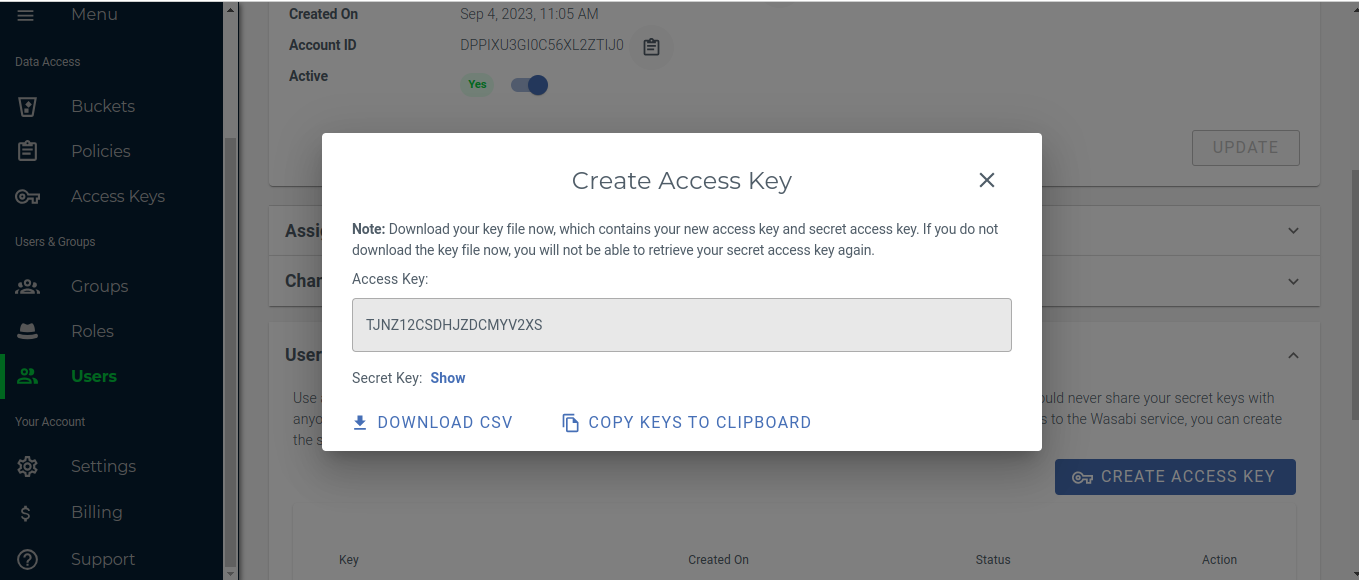
The secret is shown once. Store it in your secret manager, not in a ticket.
Scan schedules
- Frequency options None, every 4 hours, every 8 hours, every 12 hours, or every 24 hours. None keeps the connection but only ingests when you press Run Now.
- Changing a schedule The pencil icon on the row opens Scan frequency. Changes apply from the next cycle.
- Run Now Triggers an immediate scan of that folder — the fastest way to confirm a new connection works.
- Last Scan When the folder was last checked. Not Scanned means it hasn't run yet; if it stays that way, the credentials or folder selection are the first thing to check.
What happens after ingest
Once a recording is in, the platform:
- transcribes it and separates agent from customer speech;
- scores text sentiment and audio emotion, and measures duration, talk ratio, silence, dead air and cross talk;
- flags notable moments — risky, non-compliant or notably good;
- computes the call score from your opening / handling / closing weightage;
- masks PII in the transcript if masking is on for that workspace.
Processing counts are on Usage — Succeeded, Running, Queued, Failed and Total Calls. Minutes are drawn from your plan balance as calls process.
Attaching your own metadata
Calls can carry your own fields — campaign, queue, disposition, customer ID, anything you already track. Two routes, both on the dashboard’s Recent Calls header:
- Export downloads the current call list as a spreadsheet, so you can fill in metadata columns against real call IDs.
- Upload takes that spreadsheet back in and applies it in bulk.
- The pencil action on any single row edits that call’s metadata directly.
Metadata is worth the effort: fields you attach become filterable in the advanced filter builder, which is how you get from “all calls” to “collections calls over six minutes with negative sentiment”.